前言
- 本文选用的Python服务器操作系统,是最常用于开发和生产环境的Linux系统:Ubuntu和Centos。
- 为了测试方便和快速部署,本文将使用Docker + Rancher来部署环境。 Docker和Rancher的使用可参看本博的其他文章。
- 本文只记录实际操作过程中的必要步骤,并非完全步骤。
制作服务端Linux OS基镜像
制作Centos并启用SSH的基镜像
docker pull centos:7.5.1804 docker tag centos:7.5.1804 10.240.4.159/os/centos:7.5.1804 docker push 10.240.4.159/os/centos:7.5.1804 mkdir centos-ssh cd centos-ssh cp /usr/share/zoneinfo/Asia/Shanghai . wget http://mirrors.aliyun.com/repo/Centos-7.repo vi Centos-7.repo # 将含有aliyuncs的行都删除 vi Dockerfile #---------------------------------------------------------------------- FROM 10.240.4.159/os/centos:7.5.1804 ADD Shanghai /etc/localtime ADD Centos-7.repo /etc/yum.repos.d/CentOS-Base.repo RUN yum install openssl openssh-server -y \ && ssh-keygen -t rsa -f /etc/ssh/ssh_host_rsa_key -N "" \ && ssh-keygen -t ecdsa -f /etc/ssh/ssh_host_ecdsa_key -N "" \ && ssh-keygen -t ed25519 -f /etc/ssh/ssh_host_ed25519_key -N "" \ && sed -i "s/#PermitRootLogin.*/PermitRootLogin yes/g" /etc/ssh/sshd_config \ && echo "ydgw.cn" | passwd --stdin root ENTRYPOINT ["/usr/sbin/sshd"] CMD ["-D"] #---------------------------------------------------------------------- docker build -t 10.240.4.159/os/centos:7.5.1804-ssh . docker push 10.240.4.159/os/centos:7.5.1804-ssh # 在rancher下新建并启动容器(以下都为在rancher里操作 SSH端口16022) # docker镜像中不启动SSH,也没有设定时区,需要在rancher里设置以下两项 命令:/usr/sbin/sshd -D 添加卷:/etc/localtime:/etc/localtime:ro # 其他命令参考 # docker ps -a | grep ubuntu # docker commit -m 'install openssh vi' bcdc3c988539 10.240.4.159/os/ubuntu:18.04-ssh |
制作ubuntu并启用SSH的基镜像
docker pull ubuntu:18.04 docker tag ubuntu:18.04 10.240.4.159/os/ubuntu:18.04 docker push 10.240.4.159/os/ubuntu:18.04 mkdir ubuntu-ssh cd ubutntu-ssh vi sources.list #---------------------------------------------------------------------- deb http://mirrors.aliyun.com/ubuntu/ bionic main restricted universe multiverse deb http://mirrors.aliyun.com/ubuntu/ bionic-security main restricted universe multiverse deb http://mirrors.aliyun.com/ubuntu/ bionic-updates main restricted universe multiverse deb http://mirrors.aliyun.com/ubuntu/ bionic-proposed main restricted universe multiverse deb http://mirrors.aliyun.com/ubuntu/ bionic-backports main restricted universe multiverse deb-src http://mirrors.aliyun.com/ubuntu/ bionic main restricted universe multiverse deb-src http://mirrors.aliyun.com/ubuntu/ bionic-security main restricted universe multiverse deb-src http://mirrors.aliyun.com/ubuntu/ bionic-updates main restricted universe multiverse deb-src http://mirrors.aliyun.com/ubuntu/ bionic-proposed main restricted universe multiverse deb-src http://mirrors.aliyun.com/ubuntu/ bionic-backports main restricted universe multiverse #---------------------------------------------------------------------- cp /usr/share/zoneinfo/Asia/Shanghai . vi Dockerfile #---------------------------------------------------------------------- FROM 10.240.4.159/os/ubuntu:18.04 ADD sources.list /etc/apt ADD Shanghai /etc/localtime RUN apt update \ && apt -y upgrade \ && apt -y install vim openssh-server net-tools \ && apt clean \ && echo 'root:ydgw.cn' | chpasswd \ && sed -i "s/#PermitRootLogin.*/PermitRootLogin yes/g" /etc/ssh/sshd_config \ && mkdir /var/run/sshd ENTRYPOINT ["/usr/sbin/sshd"] CMD ["-D"] #---------------------------------------------------------------------- docker build -t 10.240.4.159/os/ubuntu:18.04-ssh . docker push 10.240.4.159/os/ubuntu:18.04-ssh # 在linux下启动容器 # docker run -d --name ubuntu-1 10.240.4.159/os/ubuntu:18.04-ssh # 在rancher下启动容器(以下都为在rancher里操作 SSH端口16021) |
制作含python3和pip3的镜像
Centos安装python3和pip3
# 为了方便日后全新部署,下面再制作含python3和pip3的系统镜像 # pip python package manager mkdir centos-python36 cd centos-python36 rz Python-3.6.6.tgz vi Dockerfile #---------------------------------------------------------------------- FROM 10.240.4.159/os/centos:7.5.1804-ssh COPY Python-3.6.6.tgz /tmp/Python-3.6.6.tgz RUN cd /tmp \ && tar zxvpf Python-3.6.6.tgz \ && cd Python-3.6.6 \ && yum -y install gcc zlib zlib-devel bzip2-devel openssl-devel ncurses-devel readline-devel sqlite-devel \ && ./configure \ && make \ && make install \ && mkdir ~/.pip \ && echo "[global]" >> ~/.pip/pip.conf \ && echo "index-url = https://mirrors.aliyun.com/pypi/simple/" >> ~/.pip/pip.conf \ && echo "[install]" >> ~/.pip/pip.conf \ && echo "trusted-host=mirrors.aliyun.com" >> ~/.pip/pip.conf \ && rm -rf /tmp/* \ && echo "export LANG=en_US.utf8" >> /etc/profile #---------------------------------------------------------------------- docker build -t 10.240.4.159/os/centos:7.5.1804-ssh-python36-sqlite . docker push 10.240.4.159/os/centos:7.5.1804-ssh-python36-sqlite # 用rancher启动用centos:7.5.1804-ssh-python36镜像创建的容器,安装Django pip3 install Django==2.0.6 |
Ubuntu安装pip3
Python3.6.5在ubuntu:18.04-ssh的基镜像中已默认安装,所以下面只安装pip3mkdir ubuntu-python
cd ubuntu-python
vi Dockerfile
#----------------------------------------------------------------------
FROM 10.240.4.159/os/ubuntu:18.04-ssh
RUN apt update \
&& apt -y upgrade \
&& apt -y install python3-pip \
&& apt clean \
&& mkdir ~/.pip \
&& echo "[global]" >> ~/.pip/pip.conf \
&& echo "index-url = https://mirrors.aliyun.com/pypi/simple/" >> ~/.pip/pip.conf \
&& echo "[install]" >> ~/.pip/pip.conf \
&& echo "trusted-host=mirrors.aliyun.com" >> ~/.pip/pip.conf
#----------------------------------------------------------------------
docker build -t 10.240.4.159/os/ubuntu:18.04-ssh-python36 .
docker push 10.240.4.159/os/ubuntu:18.04-ssh-python36
# 用rancher启动用ubuntu:18.04-ssh-python36镜像创建的容器,然后测试安装Django
pip3 install Django==2.0.6
## 参考命令
# pip3 install --index-url https://mirrors.aliyun.com/pypi/simple/ Image
# pip3 show django
# pip3 list --outdated
Windows客户端配置
相关软件
- python: https://www.python.org (本课程使用版本3.6.6)
- Sublime3
- Atom: https://atom.io/ (本课程使用版本1.28.0)
用Sublime搭建Python开发环境
python安装时指定路径如D:\Python\Python36,若安装后没有自动添加环境变更,手动将以下内容添加到PATH中D:\Python\Python36;D:\Python\Python36\Scripts;
用Sublime搭建Python开发环境(windows),详细步骤可参考https://www.cnblogs.com/joywang/p/8012743.html
测试:print('hello world')
# 保存成1.py ctrl + b 运行,能成功显示表示配置成功
Atom安装使用
windows下安装使用默认设置(下一步下一步),若安装后没有自动添加环境变更,手动将以下内容添加到PATH中C:\Users\liuyajun\AppData\Local\atom\bin
更换atom apm 国内源(加快package安装速度),修改C:\Users\liuyajun\.atom\.apm\.apmrc文件,添加以下内容:registry=https://registry.npm.taobao.org/
strict-ssl=false
安装后检测是否成功,windows cmd中执行apm install --check
Checking for native build tools done # done 代表检测正常
打开ATMO安装常用包,setting -> Install -> 搜索chineses和ftp,选择以下两个包安装
simplified-chinese-menuAtom 的简体中文语言包,完整汉化,兼容所有已发布版本 Atomremote-ftp Enable browsingremote FTP/FTPS/SFTP just like the built-in Tree View. Requires a project.
重启atom,atom如果报错"Cannot load the system dictionary for zh-CN",解决方法是打开Atom-Files-Settings-Packages搜索spell check,发现了这个spell-check的插件,
取消掉Use Locales前面的勾选或者手动填写en-US设置文件名称。
atom常用快捷键ctrl-alt-c remote-ftp:connect Remote Ftp atom-workspace
ctrl-alt-d remote-ftp:disconnect Remote Ftp atom-workspace
ctrl-alt-o remote-ftp:toggle Remote Ftp atom-workspace
新建Atom项目
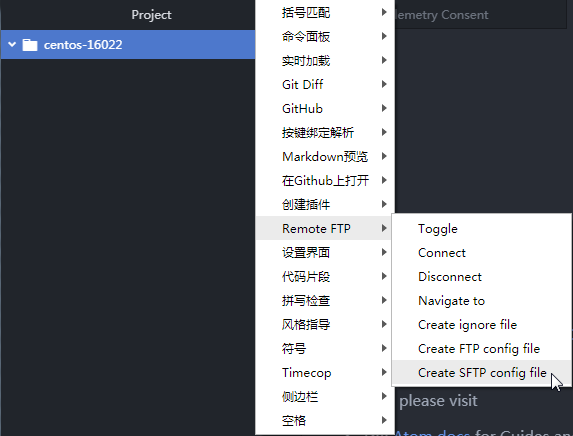
WINDOWS在工作目录下新建一个空目录,如centos-16022,将这个目录拖拽到Atom中,然后扩展->Remote FTP->Create SFTP config file
修改 host/port/user/pass几项内容后保存{
"protocol": "sftp",
"host": "10.240.4.160",
"port": 16022,
"user": "root",
"pass": "ydgw.cn",
"promptForPass": false,
"remote": "/",
"local": "",
"agent": "",
"privatekey": "",
"passphrase": "",
"hosthash": "",
"ignorehost": true,
"connTimeout": 10000,
"keepalive": 10000,
"keyboardInteractive": false,
"keyboardInteractiveForPass": false,
"remoteCommand": "",
"remoteShell": "",
"watch": [],
"watchTimeout": 500
}
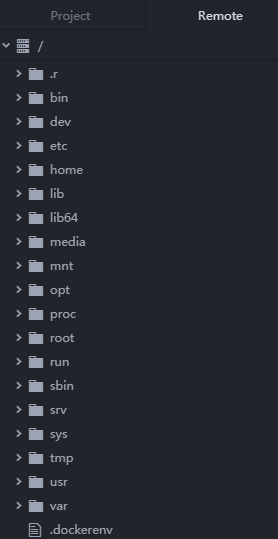
ctrl + alt + c连接远程服务器,成功显示如下
ctrl + alt + o 打开Remote标签,可以查看远程目录,并修改内容