为什么生产环境中Docker要部署在Ubuntu上
原来为了兼容企业级应用,之前学习Docker选用了Centos7做为部署安装Docker的系统平台,但在阅读官方文档后发现,Centos7下默认的Docker存储驱动在生产环境中部署是会有一些问题。

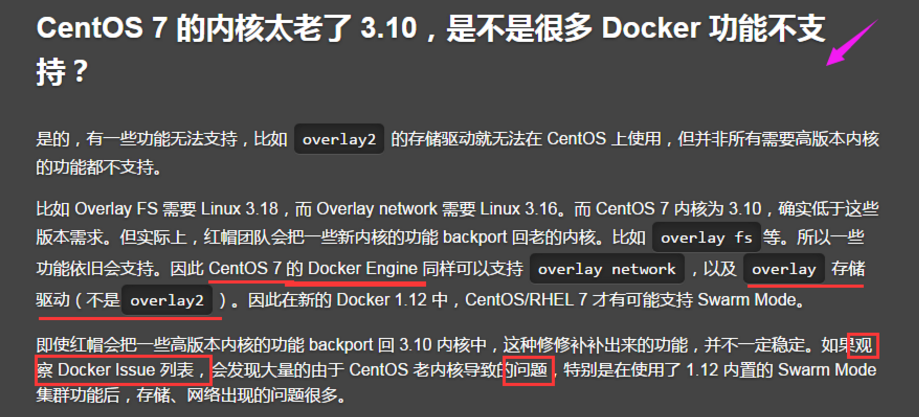
详细可参考这篇文章:http://blog.csdn.net/csdn_duomaomao/article/details/78499639
在Ubuntu上安装Docker
查看系统版本
uname -a
Linux ubuntu 4.15.0-34-generic
cat /proc/version
Linux version 4.15.0-34-generic (buildd@lgw01-amd64-047) (gcc version 7.3.0 (Ubuntu 7.3.0-16ubuntu3))
lsb_release -a
No LSB modules are available.
Distributor ID: Ubuntu
Description: Ubuntu 18.04.1 LTS
Release: 18.04
Codename: bionic
|
移除旧的Docker版本
sudo apt-get remove docker docker-engine docker.io
|
安装必要的一些系统工具
sudo apt-get update
sudo apt-get -y upgrade
sudo apt autoremove
sudo apt-get -y install apt-transport-https ca-certificates curl software-properties-common
|
安装GPG证书并使用阿里源
curl -fsSL http://mirrors.aliyun.com/docker-ce/linux/ubuntu/gpg | sudo apt-key add -
sudo apt-key fingerprint 0EBFCD88
pub 4096R/0EBFCD88 2017-02-22
Key fingerprint = 9DC8 5822 9FC7 DD38 854A E2D8 8D81 803C 0EBF CD88
uid Docker Release (CE deb) <docker@docker.com>
sub 4096R/F273FCD8 2017-02-22
#--------------------------------------------------------------
sudo add-apt-repository "deb [arch=amd64] http://mirrors.aliyun.com/docker-ce/linux/ubuntu $(lsb_release -cs) stable"
sudo apt-get update
|
安装DOCKER CE
为了之后配置使用rancher和kubernetes,这里安装指定版本的docker(17.03.2-ce)
版本的选择参考:https://rancher.com/docs/rancher/v1.6/en/hosts/#supported-docker-versions
sudo apt-cache madison docker-ce
docker-ce | 18.06.1~ce~3-0~ubuntu | http://mirrors.aliyun.com/docker-ce/linux/ubuntu bionic/stable amd64 Packages
docker-ce | 18.06.0~ce~3-0~ubuntu | http://mirrors.aliyun.com/docker-ce/linux/ubuntu bionic/stable amd64 Packages
docker-ce | 18.03.1~ce~3-0~ubuntu | http://mirrors.aliyun.com/docker-ce/linux/ubuntu bionic/stable amd64 Packages
sudo apt install docker-ce
sudo apt -y install docker-ce=18.06.1~ce~3-0~ubuntu
|
查看docker版本及运行信息
sudo docker version
Client:
Version: 18.06.1-ce
API version: 1.38
Go version: go1.10.3
Git commit: e68fc7a
Built: Tue Aug 21 17:24:51 2018
OS/Arch: linux/amd64
Experimental: false
Server:
Engine:
Version: 18.06.1-ce
API version: 1.38 (minimum version 1.12)
Go version: go1.10.3
Git commit: e68fc7a
Built: Tue Aug 21 17:23:15 2018
OS/Arch: linux/amd64
Experimental: false
sudo docker info
Containers: 0
Running: 0
Paused: 0
Stopped: 0
Images: 0
Server Version: 18.06.1-ce
Storage Driver: overlay2
Backing Filesystem: extfs
Supports d_type: true
Native Overlay Diff: true
Logging Driver: json-file
Cgroup Driver: cgroupfs
Plugins:
Volume: local
Network: bridge host macvlan null overlay
Log: awslogs fluentd gcplogs gelf journald json-file logentries splunk syslog
Swarm: inactive
Runtimes: runc
Default Runtime: runc
Init Binary: docker-init
containerd version: 468a545b9edcd5932818eb9de8e72413e616e86e
runc version: 69663f0bd4b60df09991c08812a60108003fa340
init version: fec3683
Security Options:
apparmor
seccomp
Profile: default
Kernel Version: 4.15.0-36-generic
Operating System: Ubuntu 18.04.1 LTS
OSType: linux
Architecture: x86_64
CPUs: 16
Total Memory: 31.41GiB
Name: ubuntu
ID: AQXX:XUK3:VP7F:RXXQ:4DSS:PYYC:QPK5:OOZH:I75I:CZ2H:IFSI:GFLM
Docker Root Dir: /var/lib/docker
Debug Mode (client): false
Debug Mode (server): false
Registry: https://index.docker.io/v1/
Labels:
Experimental: false
Insecure Registries:
127.0.0.0/8
Live Restore Enabled: false
WARNING: No swap limit support
|
设置不更新指定版本的docker-ce
sudo echo "docker-ce hold" | sudo dpkg --set-selections
sudo dpkg --get-selections | more
sudo dpkg --get-selections | grep hold
sudo echo "docker-ce install" | sudo dpkg --set-selections
sudo dpkg --get-selections | grep docker
docker-ce install
|
卸载Docker CE
sudo apt-get purge docker-ce
sudo rm -rf /var/lib/docker
|
使用阿里镜像加速器
使用阿里云专属加速器加快获取Docker官方镜像,否则在国内速度会慢到你无法忍受哒。步骤如下:
- 免费注册一个阿里云账号 www.aliyun.com
- 进入加速器页面 https://cr.console.aliyun.com/#/accelerator
- 选择
镜像加速器
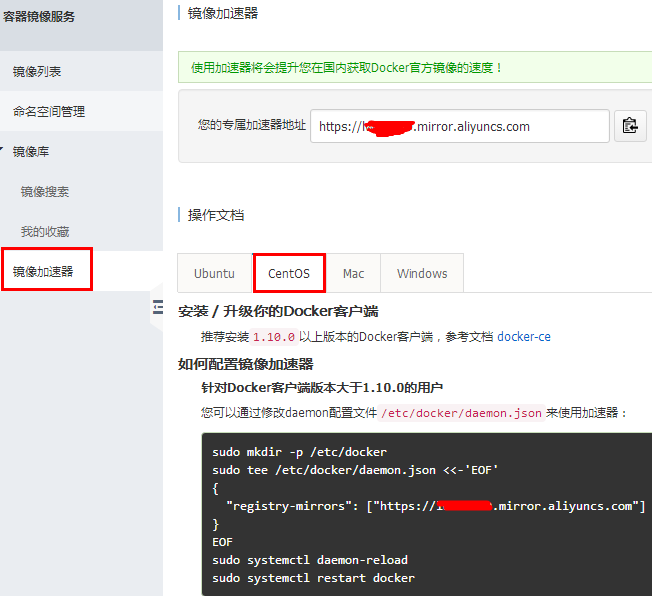
按图中进行相关配置
sudo tee /etc/docker/daemon.json <<-'EOF'
{
"registry-mirrors": ["https://xxxxxxx.mirror.aliyuncs.com"]
}
EOF
sudo /etc/init.d/docker restart
sudo systemctl restart docker
|
更改ubuntu源为阿里源
sudo vi /etc/apt/sources.list
deb http://mirrors.aliyun.com/ubuntu/ bionic main restricted universe multiverse
deb-src http://mirrors.aliyun.com/ubuntu/ bionic main restricted universe multiverse
deb http://mirrors.aliyun.com/ubuntu/ bionic-security main restricted universe multiverse
deb-src http://mirrors.aliyun.com/ubuntu/ bionic-security main restricted universe multiverse
deb http://mirrors.aliyun.com/ubuntu/ bionic-updates main restricted universe multiverse
deb-src http://mirrors.aliyun.com/ubuntu/ bionic-updates main restricted universe multiverse
deb http://mirrors.aliyun.com/ubuntu/ bionic-proposed main restricted universe multiverse
deb-src http://mirrors.aliyun.com/ubuntu/ bionic-proposed main restricted universe multiverse
deb http://mirrors.aliyun.com/ubuntu/ bionic-backports main restricted universe multiverse
deb-src http://mirrors.aliyun.com/ubuntu/ bionic-backports main restricted universe multiverse
sudo apt-get update
sudo apt-get -y upgrade
sudo vi /etc/hosts
221.206.129.236 mirrors.aliyun.com
91.189.88.162 archive.ubuntu.com
91.189.92.150 archive.canonical.com
vi /etc/network/interfaces
修改
dns-nameservers 10.240.4.159
vi /etc/netplan/50-cloud-init.yaml
network:
ethernets:
ens160:
addresses:
- 10.240.4.185/24
dhcp4: false
gateway4: 10.240.4.254
nameservers:
addresses: [10.240.4.159,10.240.4.160]
search: []
version: 2
netplan apply
netstat -nltp | grep systemd-resolv
tcp 0 0 127.0.0.53:53 0.0.0.0:* LISTEN 1017/systemd-resolv
systemctl list-unit-files | grep resolv
dbus-org.freedesktop.resolve1.service enabled
systemd-resolved.service enabled
systemctl restart systemd-resolved.service
systemd-resolve --status
|
Ubunut 18.04 DNS问题
vi /etc/systemd/resolved.conf
[Resolve]
DNS=10.240.4.159 10.240.4.160
LLMNR=no
systemctl stop systemd-resolved
systemctl disable systemd-resolved
systemctl list-unit-files | grep resolv
systemd-resolved.service disabled
rm /etc/resolv.conf
vi /etc/resolv.conf
nameserver 10.240.4.159
nameserver 10.240.4.160
hostnamectl
Static hostname: ubuntu
Icon name: computer-vm
Chassis: vm
Machine ID: ba3546d2eb174ef4b6d4d71ebb1fa616
Boot ID: 99539141d36149ccb20bd164d184b211
Virtualization: vmware
Operating System: Ubuntu 18.04.1 LTS
Kernel: Linux 4.15.0-36-generic
Architecture: x86-64
vi /etc/cloud/cloud.cfg
hostnamectl set-hostname docker185
vi /etc/hosts
127.0.0.1 localhost.localdomain localhost
10.240.4.185 docker185
vi /etc/hostname
docker185
vi /etc/cloud/cloud.cfg
preserve_hostname: true
reboot
|